


Drawstring Bag by Jennifer Ryan Kelly
Craft Curator Jennifer Ryan Kelly
This project is a representation of the past. Using clothes that have beautiful and tragic memories, I will turn them into something new, giving them a new lease on life.

What you need: a button, needle, thread, scissors, varying material of your choice, and yourself.
Step 1: Find materials!
There's no need to buy anything, reuse old memories or things that don't serve a purpose anymore! Have a look around your closet, ask friends and families, or, if you really wanted to, check your local charity or secondhand shops! The possibilities are endless.
Step 2: Give them a wash!
Next time you need to wash your laundry for the week, throw in the materials you'll use for your bag.

Step 3: Chop chop!
Think about it, do you want your bag big or small? Either or doesn't matter! I started by cutting the dress, with my scissors, into various shapes. I envision the straps of the dress as a handle for my bag.

Step 4: Here we go
Work at a desk, on your bed, or on the floor!
I thread the thread through the needle, this might take a little practice and patience! Making sure to get about an arm’s length of thread to start off with.
Using felt paper, I roughly have an A4 sheet of it, but you can use any material and size of your choice!
I like to call this the full stop, except this, will be at the start and end of our line work.
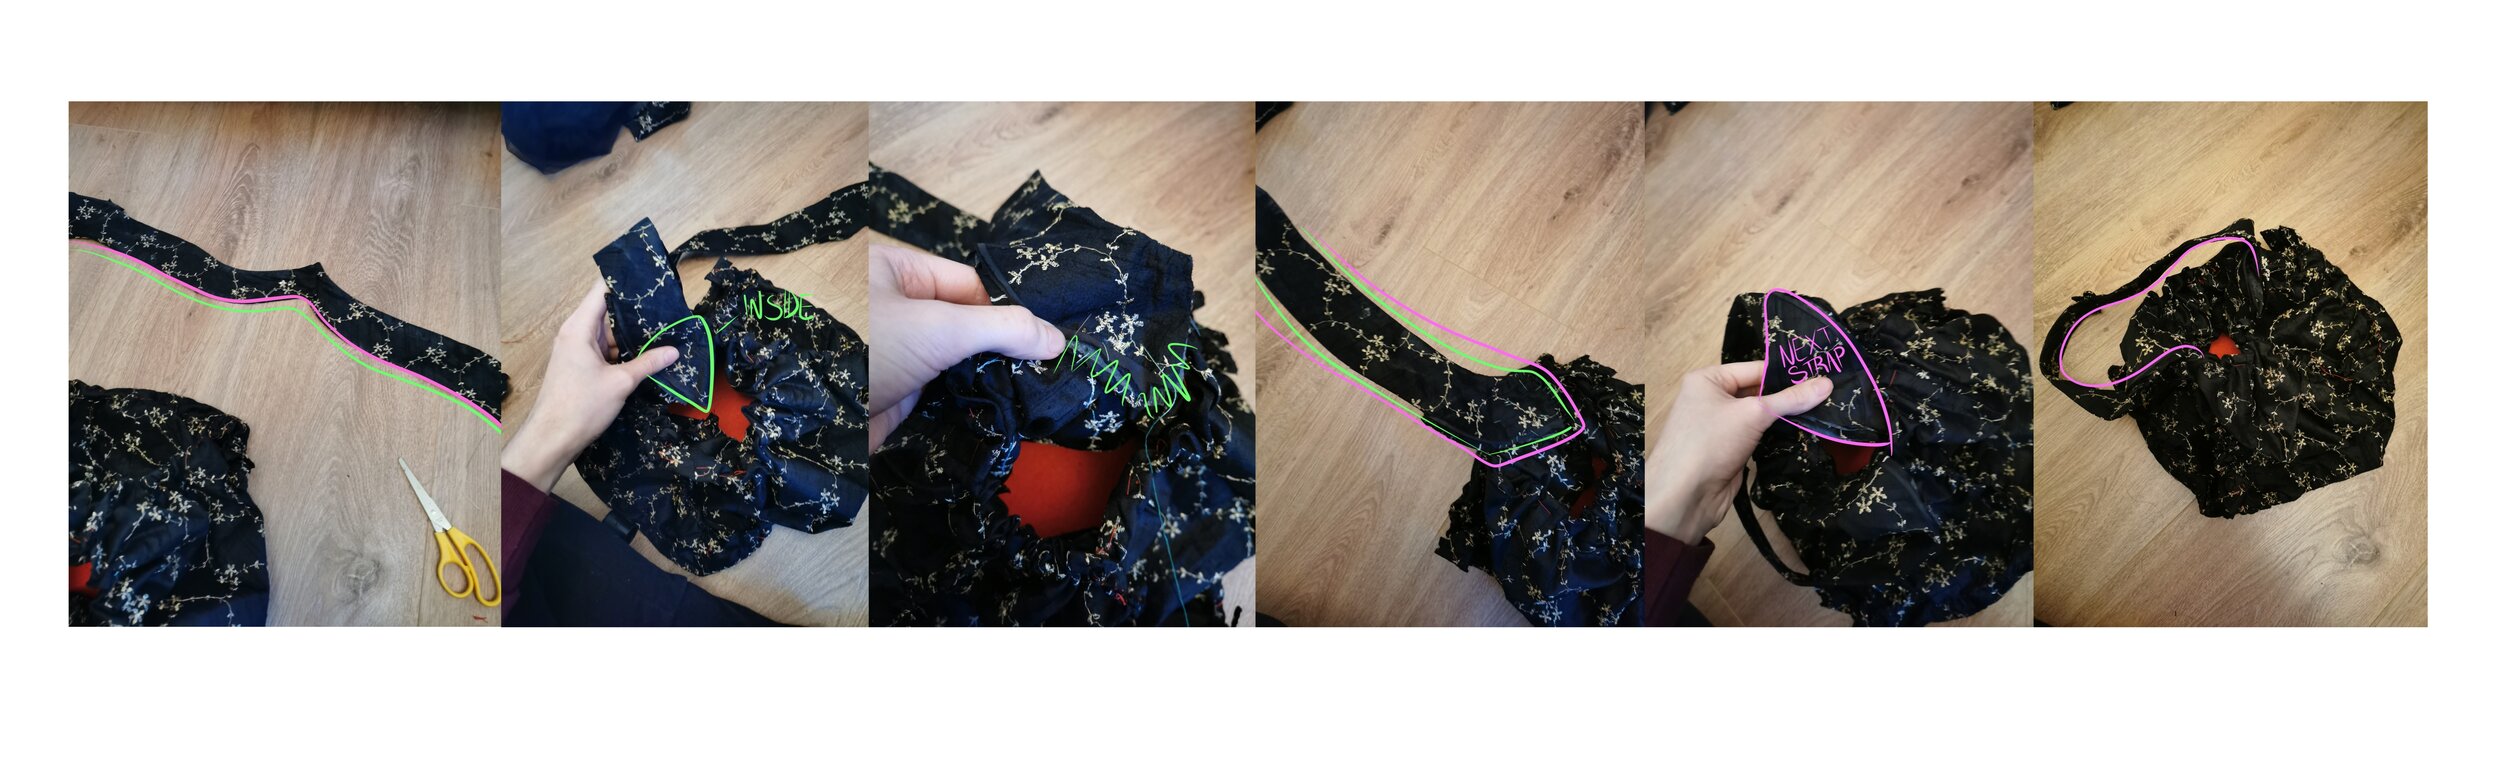
Take your needle with the thread attached and pierce the corner of the two materials together, making them relatively straight.
Send your needle back where it came from and pierce it around the same area again. Now start zig-zagging your way up the materials, so they're connected together.
When you're finished, do the full stop! Make sure to tie your thread at the end, times three, in order to secure it.
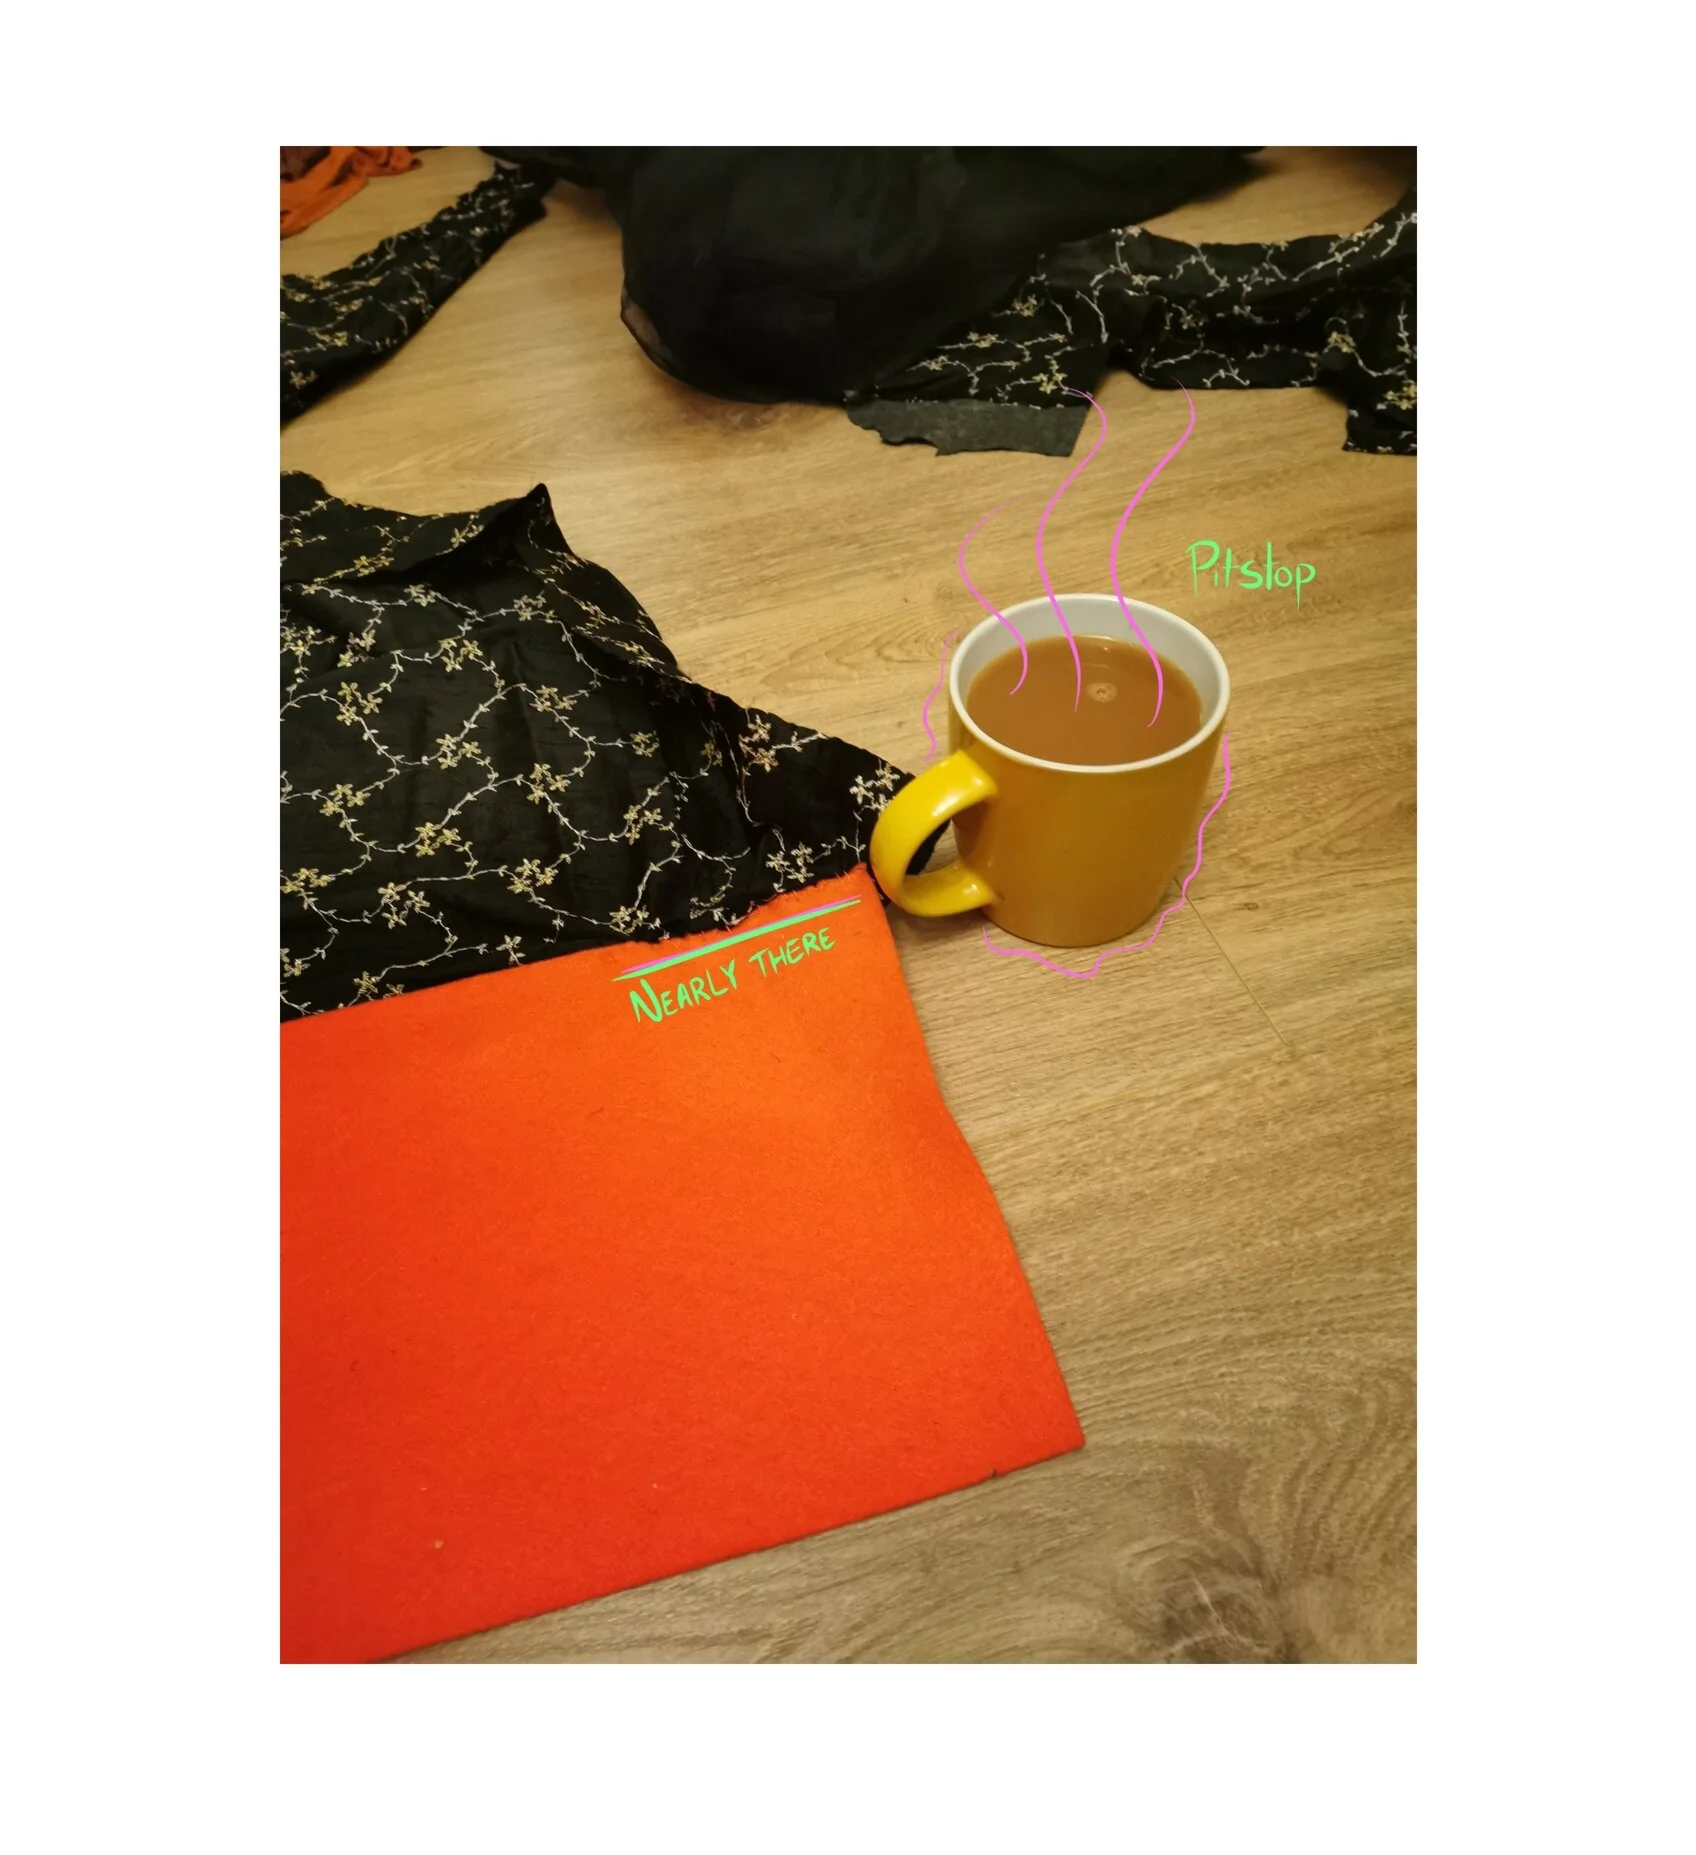
Step 5: Get comfy
There's no rush in making your bag, take all the time you need. Make a cup of tea for yourself and listen to some music. I'll mention the songs I listened to at the end of this tutorial if you would like to check them out!

Step 6: Repeat
Follow step 4 and repeat it on the remaining three sides of your material, until you have floppy walls that are waiting to be built!
Once you're done, make sure you have secured your thread by tying it and then cut any loose thread or material that has no purpose.

Step 7:
Grabbing two corners of the bag, pin-up along with the fabric, in order to start making the inside of the bag. Once you have the pins securely in, you can start hand—sewing your way up the bag- just like you did before!
Repeat this 3 more times on each corner of your bag.
Now your bag can hold things! Only a few more steps to go before we're finished.

Step 8:
If the entrance of the bag is frayed, what you can do is fold it inwards and pin the frayed parts on the inside of the bag. Then, pin them all down and work your way around the bag sewing in and out until you have come full circle. Then, tie a knot!
Step 9:
Attaching the handle of your bag. Earlier, I cut the straps from my dress. I start by taking one end of the strap, positioning and pinning it to the inner mouth of my bag, and start sewing. Do the same on the opposite side.
You now have a handle for your bag!
Step 10:
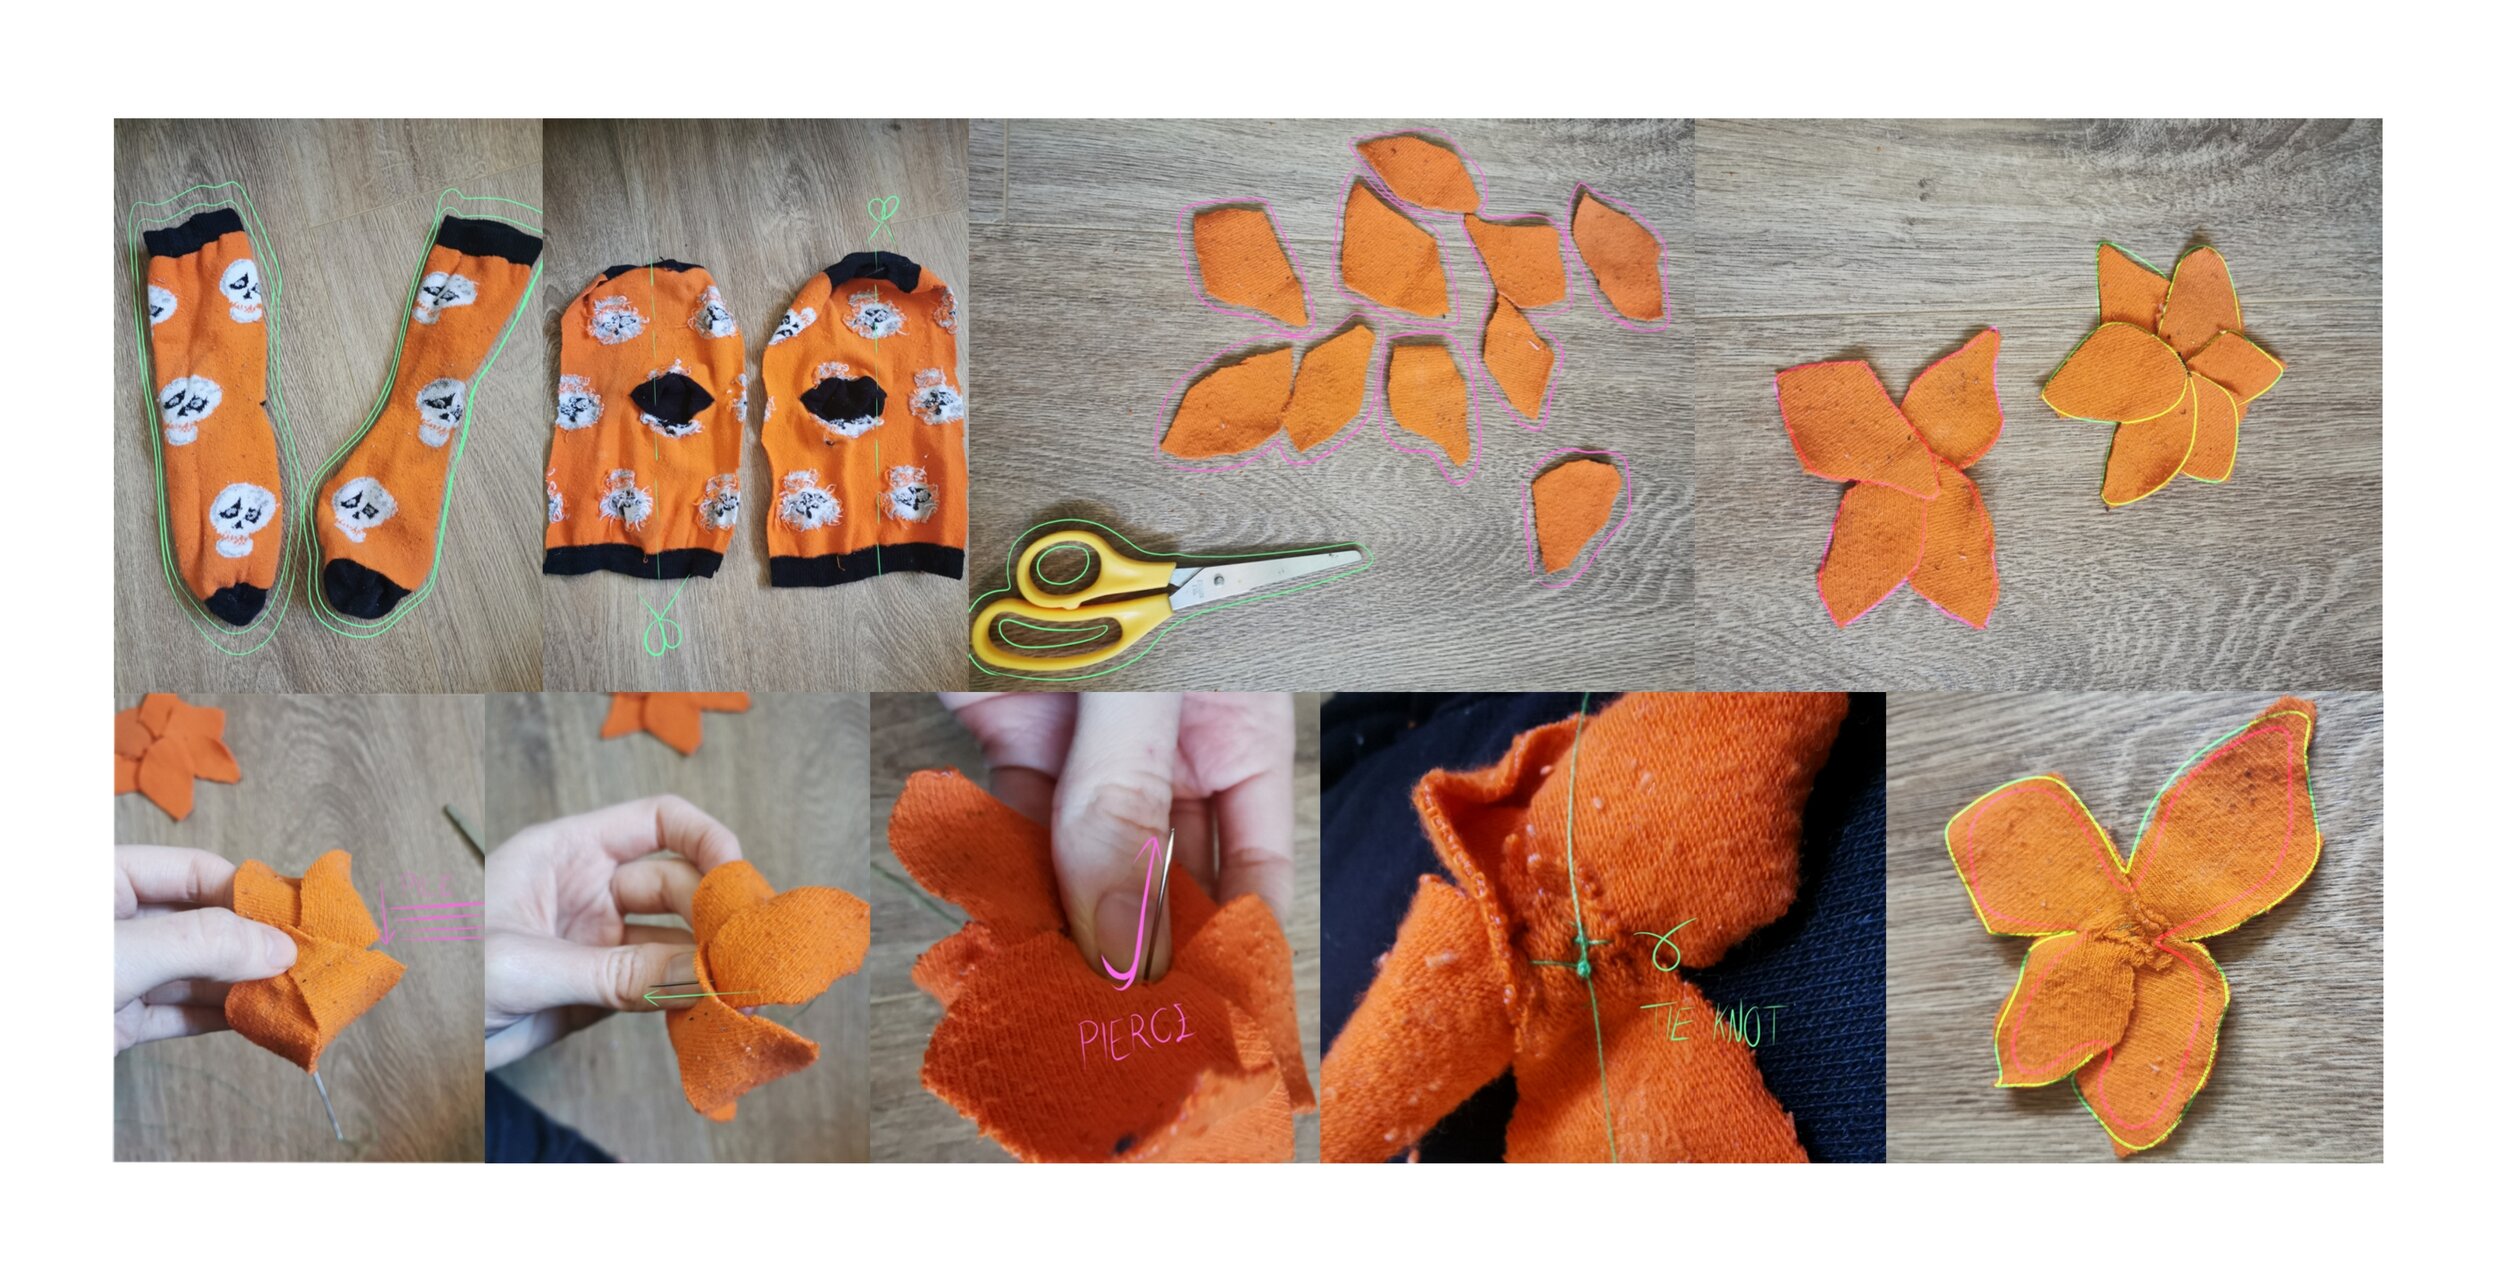
I have old, washed socks that will be perfect for little designs on my bag.
I cut the socks in half and cut out shapes from the orange part. You can choose any colour or shape you would like!
I want to make little flowers so I attach the ends of the designs together and begin to sew through them all.
Using the same method I used on step 4, I keep securing the patterns together until I'm happy with how they're looking.
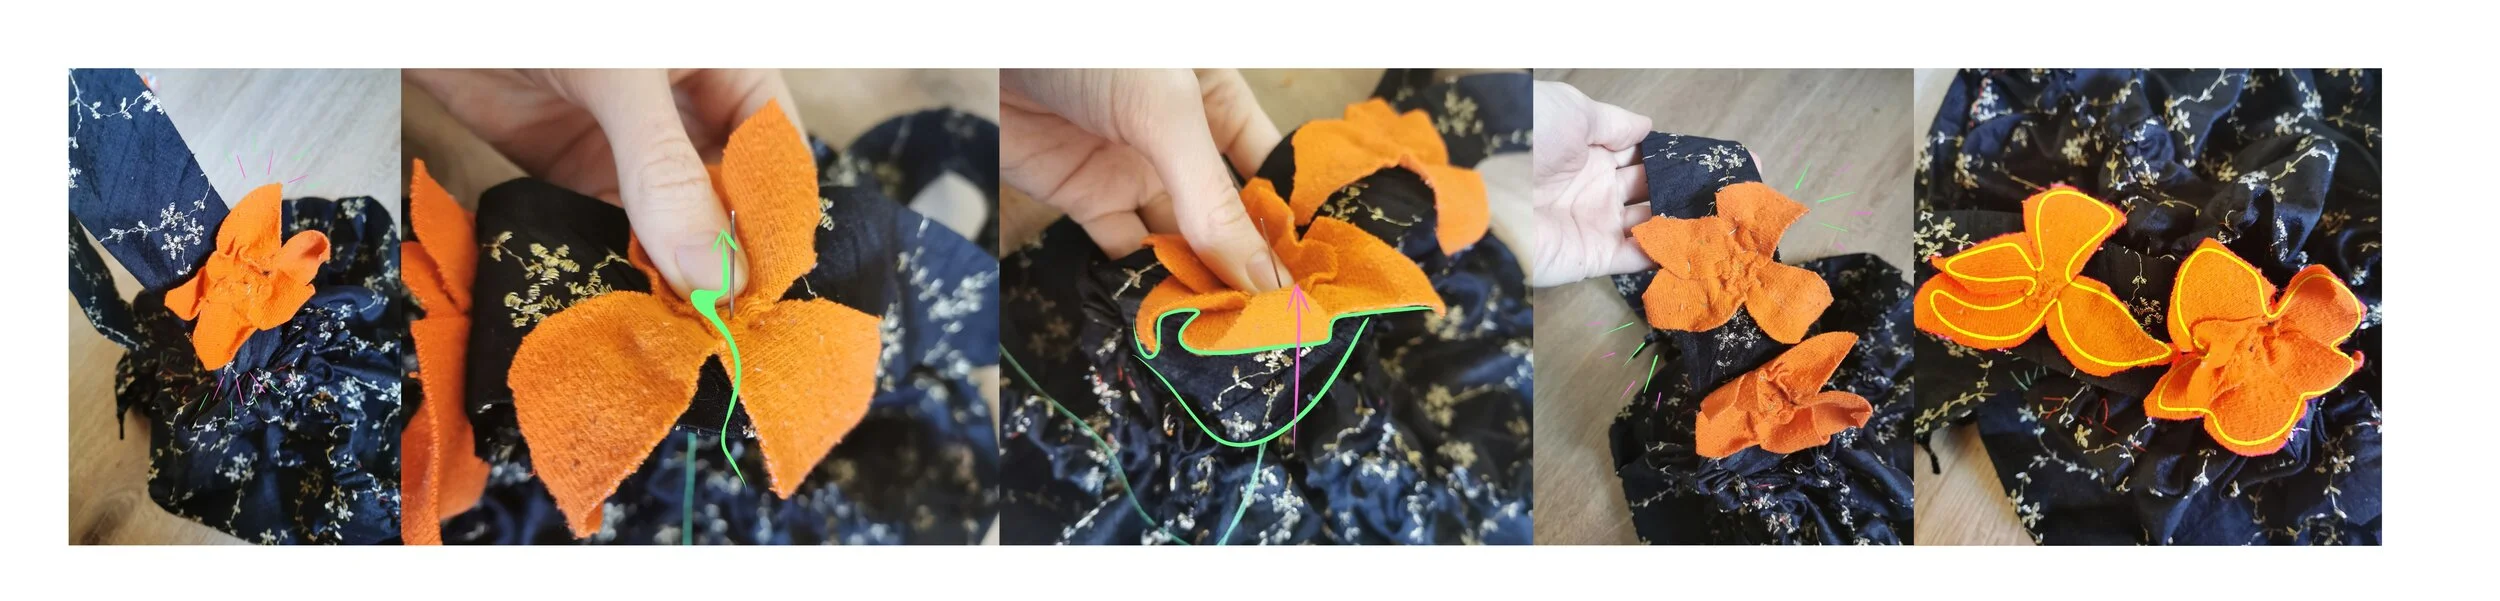
Step 11:
I decide where to place them on my bag. I'm going to decorate them on my handle. Once I have the flowers positioned, I sew them in a couple of times to secure.
Now they're attached and they're not going anywhere!
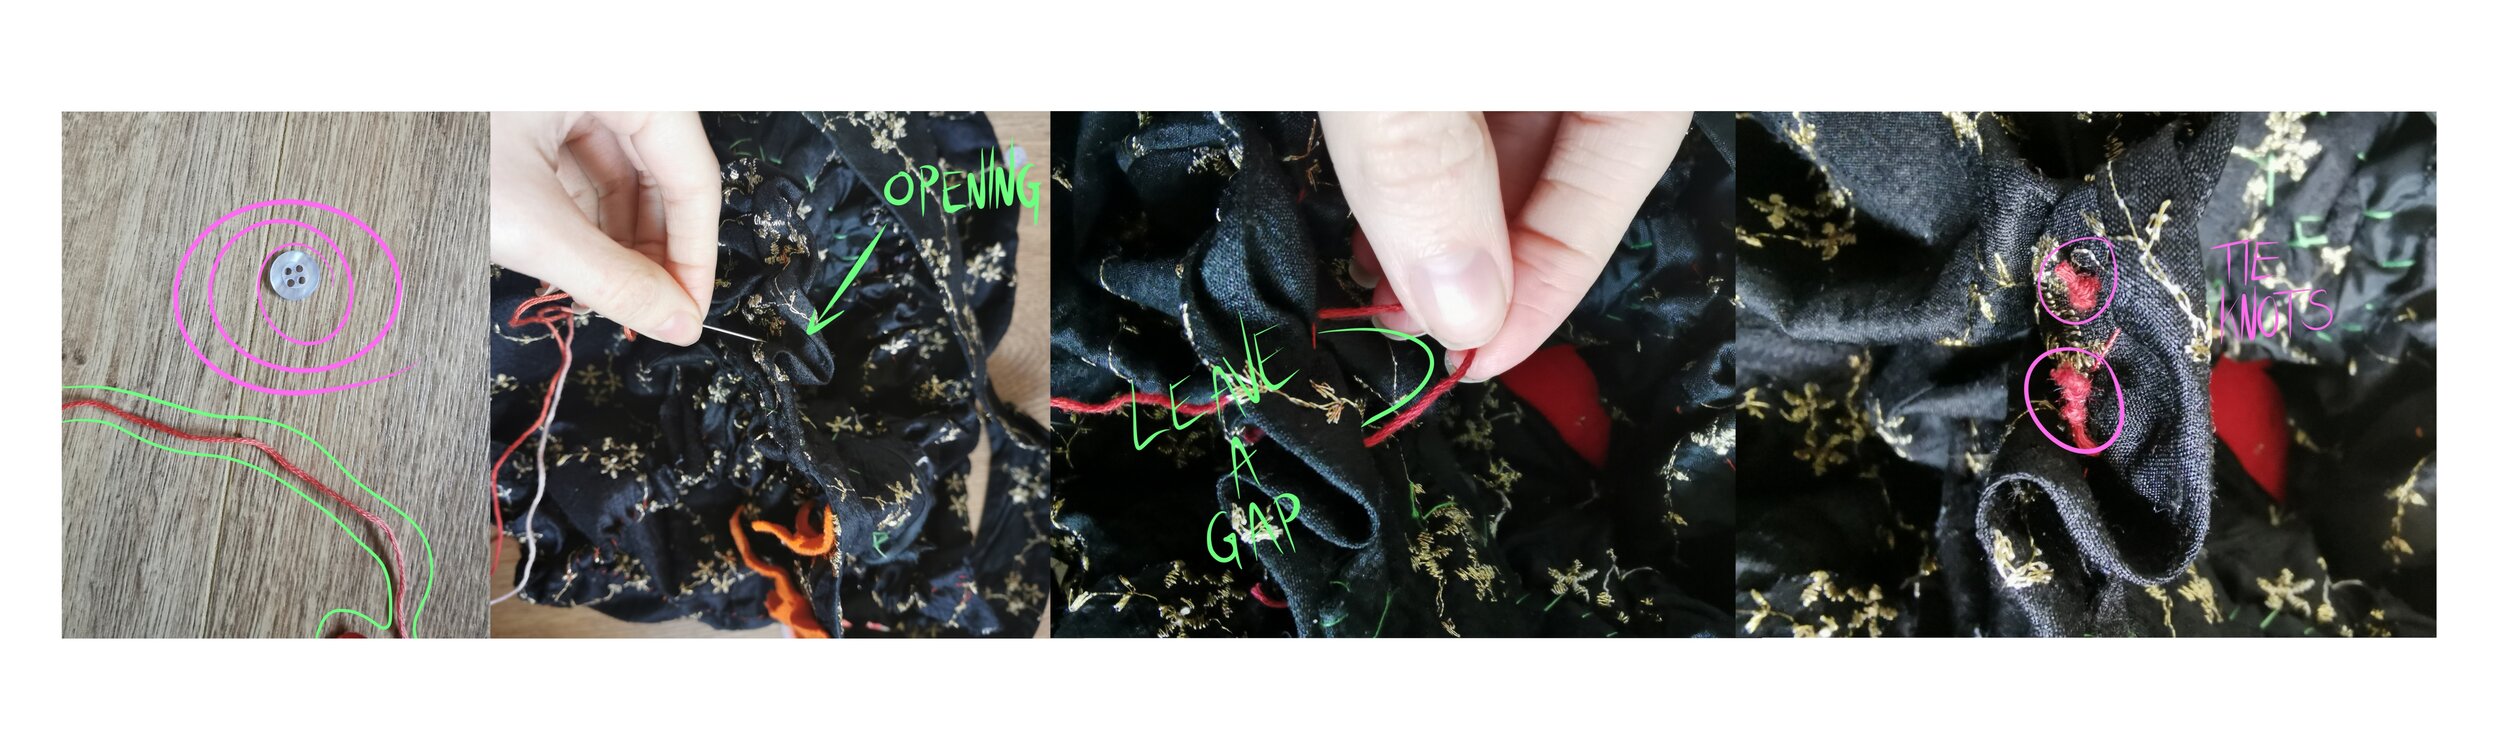
Step 12:
Now, grab a button and a piece of thread and let's make a clasp for your bag! Put your thread through the needle and locate the entrance of your bag, make a little loop on the inside of it. This will be a little handle for the button to go onto.
Tie two knots on opposite ends of the thread, depending on how long or short you want it to be.
Next, get your buttons and sew it in on the opposite side of the entrance.
Once it is properly secure you can open and close your bag, yippee!!
Step 13:
Congratulations! You're finished your bag! You can customise it more, if you would like, but if you're content that's brilliant!

